
When: 12 July 2019, 10:30am
Members present: All
Aim for today: PIZZA! 🍕
…and trying out different types of prints with our awesome embroidery machine! And possibly adding in our automated yarn spool!
Problem | Testing the printer with larger prints
After yesterday’s success, we were excited to try something bigger and better – a 40mm x 40mm cube, double the size of our successful print yesterday.
The first thing we noticed was that it took very very long for the embroidery machine to reach its starting position. We thought it was because the cube was much larger, but after waiting for nearly 5 minutes, we noticed that the printer was following the shape of a square – meaning that the extruder motor (which controls the jabbing motion) was not activated.
We tested the smaller print (20mm x 20mm) again to see if the problem was with the slicing. The smaller print worked fine – printing just as well as it did last night.
(insert timelapse of smaller print)
We tried increasing the size slowly, starting with 30mm x 30mm. Sadly, this resulted in the same issue as the 40mm x 40mm cube – the needle didn’t jab at all.
Tony came by to check what was going on, and he realised that the wire for the z-axis homing switch was unplugged. Thinking that might be causing the problem, we plugged it back in and ran the 30mm x 30mm cube again, but the needle still didn’t jab.
Tony asked us to try printing a different object, suggesting this object from Thingiverse. Our first print didn’t work out (the machine restarted), probably because the speed was too high. When we checked the settings, we found that we had changed the layer height to 1.0000mm instead of 0.2000mm, which is also supposed to increase the extrusion speed.
So, we lowered the extruder multiplier from 1.50 to 0.50 to reduce the extrusion speed, and tested out this new setting by test-printing a letter of the alphabet – P!
The print started off well, but after printing part of the P, the printer started shifting towards a different position without jabbing, possibly due to the slicing. This ended up breaking the needle as the needle was dragged along as it moved to the next position.

Since we had to replace the needle, we started working on the stepper motor for the automated yarn spool.
NEW | Setting the stepper for the automated yarn spool
Using a separate Arduino controller, we wired our stepper motor for the yarn spool to the Extruder, E0 port. Afterwards, using our previously modified basicstepperdriver library on Arduino, we managed to tweak a few lines of code in the library to achieve almost the same movement, which Vanessa used manually with her hands to loosen the yarn tension for a successful print job.
First, we had to change the n value for motor_steps n to 200 and the RPM value to 120 for our previously purchased Creality 3D Two Phase 42-34 RepRap 42mm Stepper Motor. Next, we had to change the n value in DIR n, STEP n and SLEEP n according to the Ramps1.4 schematic diagram. As we connected our stepper motor for the yarn spool to the Extruder, E0 port, the n values are 28, 26 and 24 respectively. Afterwards, we had to decrease the micro-step value to 0.125 such that the stepper motor only rotates a certain angle instead of rotating 360o. In addition, in order to match the rotation of the stepper motor with the jabbing speed of the LA, we needed to decrease our delay time period by changing the n value in delay(n) and delayMicroseconds(n) to 800 ms. Lastly, we needed to change the direction of rotation by the stepper motor so that it rotates in the direction that allows the yarn to be fed out. This is achieved by changing the sign of the numerical value in stepper.move(1).
And YAY, after programming the stepper motor with this basicstepperdriver library, the stepper motor is up and running, moving slowly and discretely, like how we manually turn the yarn spool.
The final code can be seen here:


Problem | Redesigning the yarn feeder: Yarn Feeder Mk XIII
When we replaced the needle, the needle protruded from the bottom of the yarn feeder because of the shortened height. This created some issues when we started a new test print, and the needle broke for the second time today 😭
We redesigned the yarn feeder (yet again) to retain the original length, while also shortening the yarn-catch region, to prevent the yarn from protruding from the yarn feeder.
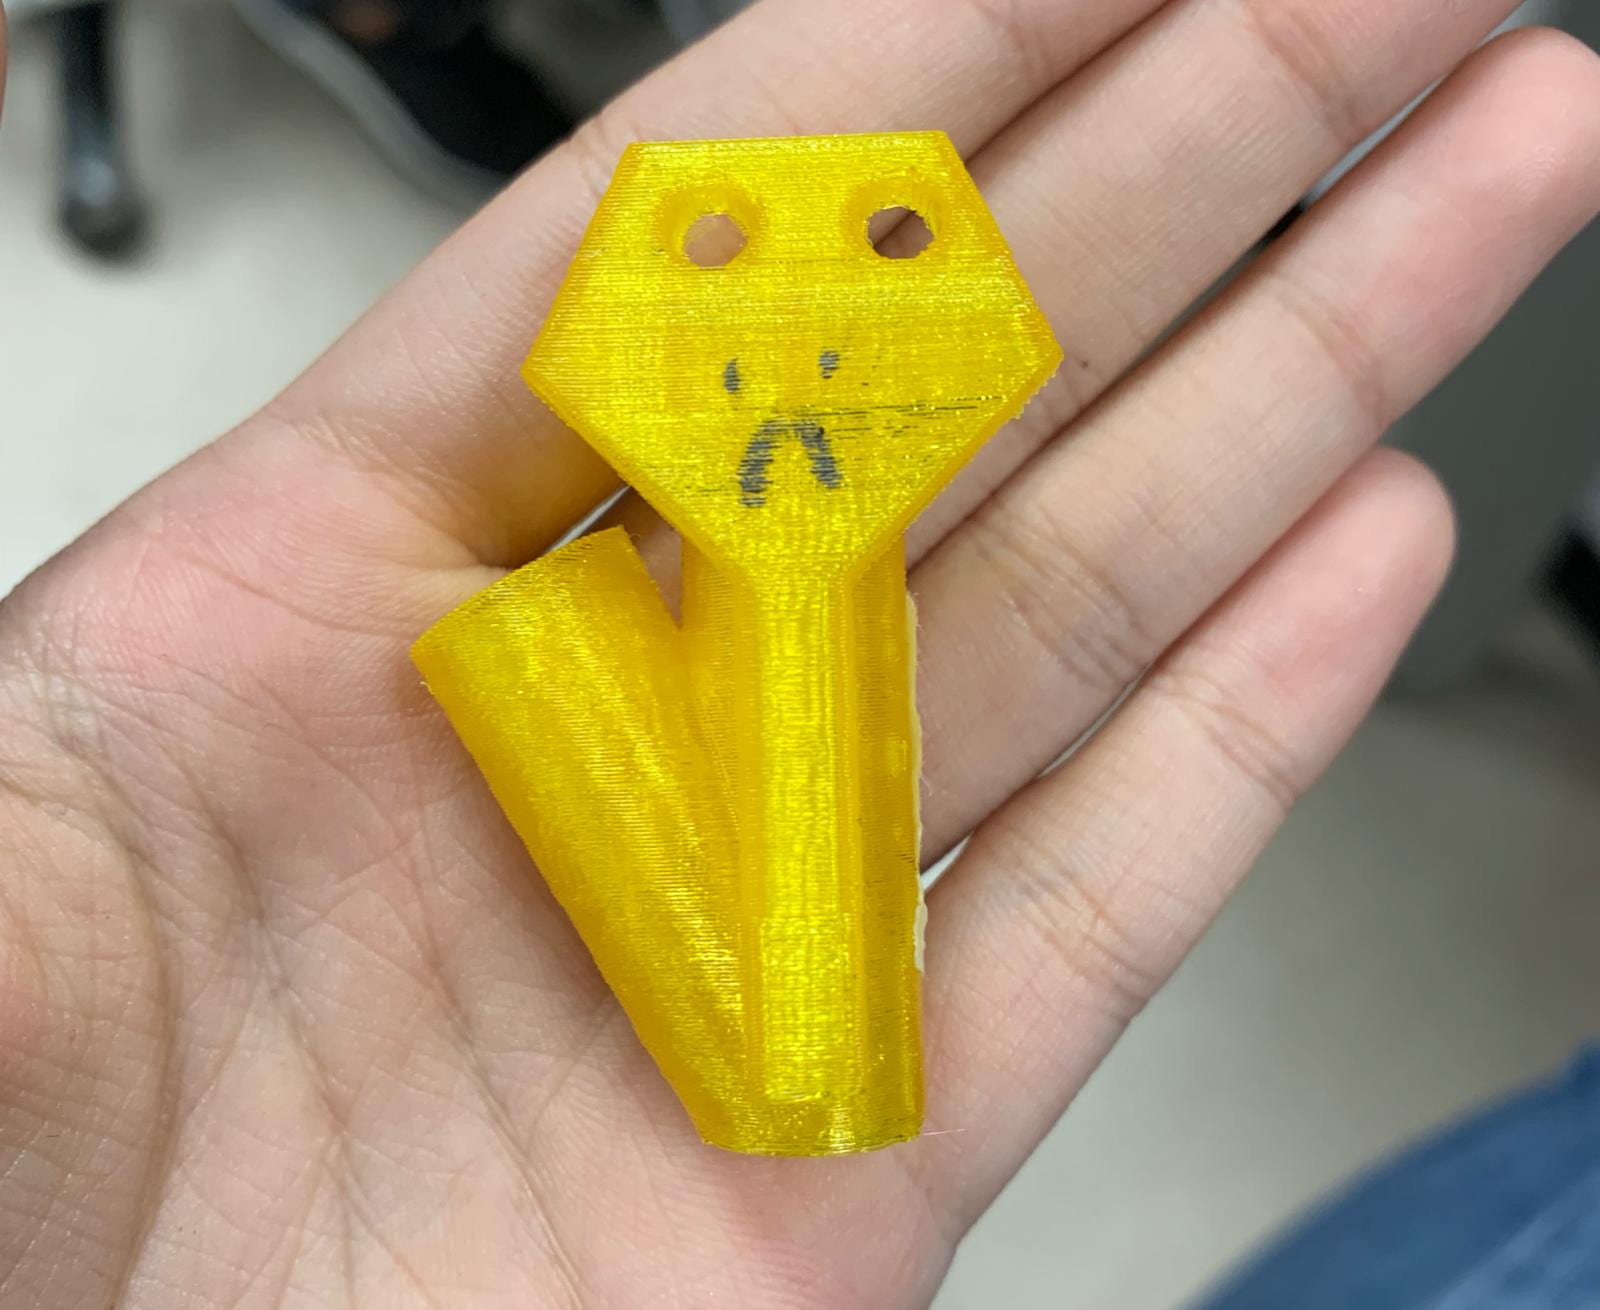
Yarn Feeder Mk XIII. Unfortunately, we had to reprint it because the openings were not well printed. This golden piece above is the failed Print 1.
More test prints…
With the newest yarn feeder still printing, we switched back to our previous yarn feeder (Mk X) to continue testing our printer. While we were testing if the yarn feeder still works, the needle broke AGAIN.
Testing the motion automated yarn spool (without felting)
We’re down to one needle, so we decided that it’ll be better to focus on things that didn’t require the needle. So, we decided to test out the motion of our automated yarn spool by connecting the motor to the blue yarn spool (as pictured in [#29]).
While we were testing this, Guo Yao mentioned that our design isn’t that good because of simple math – keeping the angle of rotation constant, having a larger radius (e.g. when the yarn spool is full) will make more yarn feed out, while having a smaller radius (e.g. when the yarn spool is almost empty) will make less yarn feed out. He then suggested that we use a different design, similar to the tensioning mechanism of a sewing machine (I think!).
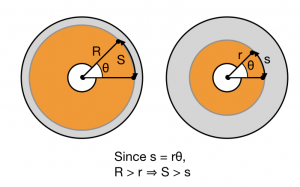
The “simple math” that Guo Yao was talking about.
Modification to the automated yarn spool design
Essentially, the modification would be to move the automatic turning of the yarn spool to an external spool only holding 1-3 turns of yarn. The yarn would go from a larger main spool to the automated external spool, then to the yarn feeder before finally being felted into the cloth. This new design would ensure that there is a constant feed of yarn into the yarn feeder by keeping the length of yarn being fed out constant.
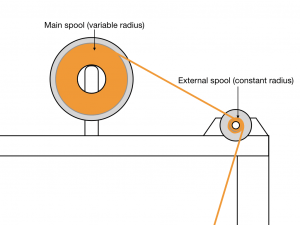
Modified design for our yarn tension mechanism!
A GREAT REALISATION
However, we realized that even with the newly designed yarn feeder, the needle breakage problem will still exist. This is because for every shell layer of the print and for discontinuous print, the stepper motor will stop rotating and the needle will stop jabbing while the main body moves in the X/Y direction to reach the next coordinate. This means that there is always a chance that the needle might be partially or fully extended when the stepper motor stops rotating. Thereby, allowing the needle to be dragged along the fabric and break. Hence, in order to solve this problem of discontinuous jabbing movement and needle breakage, we should allow continuous jabbing motion of the needle. This means that we need to allow the stepper motor to rotate continuously. As long as the stepper motor rotates continuously at the correct speed, we do not need the initial start code and end code to lift the main body with the needle holder encapsulated in it above the printer base at the start and end of the print respectively to prevent needle breakages.
There are 2 ways to achieve this. One is to use wire the stepper motor that controls the jabbing motion to the same Arduino controller as the stepper motor that automates the yarn spool!!! For this, we need to learn how to code for two stepper motors on Arduino, and we need to make sure all our connections on the board are correct. With Guo Yao’s help, we managed to get both motors running at the same time!! But since they’re running at the same speed, the motor for the yarn spool is actually moving too fast, while the motor for the jabbing is moving too slow. We’ll be working more on this on Monday to figure out a program that can code for the different speeds of the two motors. Though this method does work, it is not the most ideal solution as after all, we will still be using 2 separate controllers, which requires synchronization.
Hence, after talking to Tony, we thought that maybe the alternative of activating dual extruder on our firmware, Marlin, might be better albeit not being usually recommended. The benefit is that both stepper motors can be connected to the extruder ports (E0 and E1) on the same controller, which we used to wire and control our 3D printer. Hence, making it a lot easier to control both the stepper motors and the 3D printer simultaneously.
Nonetheless, we will work on the Arduino code that Guoyao have helped us with on Monday to test the feasibility of the first method. Stay tuned!!
(insert video of both motors moving if it exists?)
What needs to be done next
It seems that the issues are slowly piling up again… So here’s what we need to tackle from here:
- Figure out the G-code that allows it to print continuously without stopping in between shell layers or when changing directions.
- To prevent needle breakage halfway through the print
- Attach the new yarn feeder and test print again, while manually adjusting tension
- To test that new yarn feeder works
- Attach the automated yarn spool to test whether the tension generated allows for a successful print job.
All the problems must be solved in order, otherwise we’ll be stuck for a very long time.