When: 16 July 2019, 8.50am
Members Present: All
Update Meeting #4
For the fourth (and final) time, we had our presentation in the morning. You can find the link to presentation here!
This time, here’s what each of us presented on today:
| Alexis |
|
| Vanessa |
|
| Claudia |
|
| Carissa |
|
We weren’t interrupted this time, and it ended off with Dr Ho saying that we’ve done “very good”! 🌟 Mr Hanyang asked us about the lines of G-Code that we removed using our Python code. He thought that we would be able to remove the lines via either changing the custom start code or retraction settings. He’s interested to look at our code again because he believes that a more elegant solution exists.
Back to Work!
Test Run #1
For our next test run, we decided to make the following changes:
- We removed the feeding spool, and instead attached the main spool directly to the stepper motor via the coupler.
- We changed the felt from pink to black!
- We changed the feeding yarn.
- Steps = 50
Test Run #1: Super up close shot of the print.
Test Run #2
- Steps = 20
- Ran too fast; the corners got pulled up 🙁
Test Run #2: Corners failed to be felted on properly.
Test Run #3
- Steps = 5
- Motor was too slow; barely felted on anything at all
Test Run #3: Corners still failed to be properly felted on.
Test Run #4
- Steps = 10
- … Success!!!!
Test Run #4: Success!
With minimal interference from us, a square was quite successfully printed of its own accord! It’s just a small square but we’re excited because it was fully automated. We didn’t have to manually move the spool at all.
Print #4: A fully automated square, printed!
Test Run #5
- Same machine settings
- Print design: Mickey mouse! 🐭
With the success of the previous print, we decided to be a bit more ambitious and print Vanessa’s end-goal design for our project: Printing a mickey mouse design!
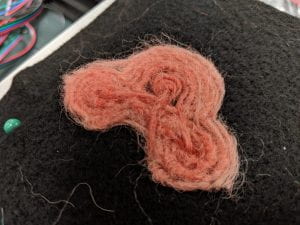
Unfortunately, we had to stop the print because the spool fell out of the stepper motor again. Carissa took another look at it, and realised that it’s because the coupler was fit on the wrong way around. We also planned to enlarge the print job, because it was a lil’ too small to see if it was really successful or not (Well, it looked more like an apple, or a peanut, than a Mickey mouse!)
(upon seeing our blog post, Guo Yao remarked: “Lil’? Whats with the millennium slang? Hais kids these days”)
Test Run #6
- Steps = 8 (10 was slightly too fast!)
- Changed one line in code
- G1 … F20 => G1 … F3000
- Increased speed of movement from homing position to start position
- Print design: Mickey mouse!!
SUCCESS!! 🎉
Timelapse of our first non-square print!
We tried printing out a larger Mickey mouse shape – and it worked (although we did intervene a bit because the yarn feeding was still slightly too fast)!

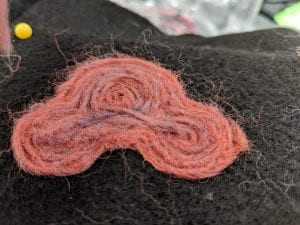
Upside down (and very successful) Mickey mouse!
We were very excited and immediately ran out to tell Mr Hanyang, who gave us some suggestions:
- Look through the G-code from Simplify3D and manually remove the G-code for subsequent layers so that the print stops automatically after the first layer;
- OR set the layer height to be the same height of the product so that only one layer prints out (e.g. 1mm layer height => 1mm print height)
- Try loading .svg files in Fusion360, extrude and save as an .stl file to send for slicing;
- Manually shift the z-axis upward and print layer upon layer – as a start to 3D printing.
- e.g. try raising by 1mm, then 1.5mm, etc.
- Try test-printing in another location (in preparation for final presentation)
He also suggested that we keep the styrofoam boards, as they show the printing path much more clearly.

Styrofoam board showing the printing path used to print Mickey mouse.
Sadly, the bracket that held our outer tubing in place cracked during the printing, probably due to wear and tear. We had to hold the bracket securely in place throughout the printing process so that the movement of the inner tube could be efficiently transferred to the needle movement.

It’s not very clear in this photo, but the bracket cracked along the two top screws.
Of course, we immediately sent the latest design of our bracket ([#20]) for printing again so we could replace the cracked part as soon as possible.
Further testing
Since we had time, we decided to try and fix the problem of the yarn feeding too fast.
- Changed Extrusion Multiplier from 0.5 to 0.1
- Print design: Mickey mouse (again!)
By reducing the extrusion multiplier, we hoped to be able to slow down the speed of the stepper motor controlling the rotation of the yarn spool. This modification worked much better than our original settings, and we managed to print Mickey mouse again! Some parts weren’t felted properly (uneven felting) due to incorrect yarn tension, but on the bright side, the yarn tension was much more consistent compared to when we printed with previous settings.
The best part about this print is that it was fully automated!!! For once, we could leave the phone to record on its own (on a stand, of course) while the print went on. (Meanwhile, Claudia went to nap 💤)

Phone recording set-up, featuring Tapioca and Tony’s reflection in the phone glass.
After a successful first layer, we decided to let the print (which has about 3 layers) continue running, but adjusted the z-axis so that the next layer would print directly on top of the first print – a start to 3D printing!
Two layers of Mickey mouse, which took more than 1 hour to print.
Right after we finished printing the two layers, our needle broke because we forgot that we could only turn off the jabbing stepper motor AFTER we end the print on the Marlin controller 😔 Thankfully, we still have a bountiful supply of needles, so we don’t have to worry about not having enough needles.
The two layers looked nearly the same as just one layer, which could be because the second layer started too low (in terms of height), or perhaps because the second jabbing caused the first layer to felt further into the fabric. We’re not too sure, but perhaps we can find out in the near future!

Mickey mouse print II.
Some improvements
The Mickey mouse prints went pretty well, but of course there are things that we can improve on.
Firstly, we need to replace the cracked bracket with our newly printed bracket. Without a stable bracket, the movement from the linear actuator may not be fully transferred to the needle for the jabbing motion. And since we are replacing the bracket, we can also replace the inner tubing which has started to bend.

The new bracket, printed using the pretty pink filament that Mr Hanyang brought for us today. THANK YOU MR HANYANG!
We also need to find a more ideal setting for the yarn feeding. We’ll try changing the extrusion multiplier to a value within the range of 0.1 – 0.5, and see which provides the best yarn feeding and tension.
That’s all for now! 👋🏻


