When: 17 July 2019, 10am
Members present: All
Based on yesterday’s progress, here’s what we’ll be working on:
- Manually remove the G-code for subsequent layers so that the print stops automatically after the first layer. (morning)
- OR Set the layer height to be the same height of the product so that only one layer prints out (e.g. 1mm layer height => 1mm print height)
- Replace the cracked bracket, bent inner tubing, stabiliser tube and broken needle. (morning)
- Find a more ideal setting for yarn feeding (vary the extrusion multiplier from 0.1 – 0.5). (morning/afternoon)
- Tidy up the styrofoam base and the messy wiring. (afternoon)
- Manually shift the z-axis upward and print layer upon layer – as a start to 3D printing. (evening)
- Try raising by 1mm, then 1.5mm, etc.
Off to work!
Problem 1 | Set layer height = height of product to make one layer print
Vanessa came earlier in the morning to test this out. She reduced the height of our test prints (cube and Mickey mouse) on Fusion360 and loaded the .stl file into Simplify3D. As Mr Hanyang predicted, this resulted in a G-code that only contained one layer, essentially allowing us to create a 2D embroidery path from a 3D design.
We tested it out without the needle jabbing movement (since our needle was still broken 😞), and the print stopped after finishing the path for one layer!! 🎉 Now we can leave our printer to finish a print without having to manually end the print! We still have to manually shut off the power at the end of the print, but that’s not such a big issue, especially since Simplify3D tells you how long the print will take.
Another method that Mr Hanyang suggested (through email) was to non-uniformly scale our model to be 1mm high (size in Z-direction = 1.00mm) so that we force it to slice as just one layer. Thank you for the very good insight!

Screenshot that Mr Hanyang sent us in his email.
Problem 2 | Replace the cracked bracket, bent inner tubing, stabiliser tube and broken needle
With the first problem out of the way, Vanessa and Carissa set to work on replacing the various dysfunctional parts.

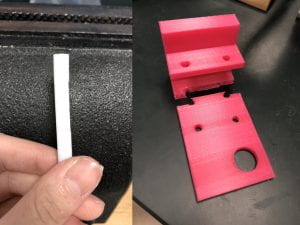
Some of our dysfunctional parts – look at how straight the crack on the bracket is!
It took more than one hour of disassembling and reassembling, but now all the parts look as good as new!

The new assembled parts, looking great!
Problem 3 | Find a more ideal setting for yarn feeding
We started playing with the settings on Simplify3D in search for a more ideal setting for our feeding stepper motor.
Extrusion Multiplier = 0.2
Since yesterday’s print, which used Extrusion Multiplier = 0.1, had some areas that were too tense, we decided to try Extrusion Multiplier = 0.2 to try and reduce the yarn tension slightly by turning the spool faster.
To our dismay, this print failed, and most of it didn’t felt properly.
Extrusion Multiplier = 0.2: Fail 1.
We regarded this as an anomaly, and tried again with the exact same file. Some parts felted, but largely the issue remained – the felting was not going very well.
Extrusion Multiplier = 0.2: Fail 2.
Two failed prints in a row and we questioned whether the problem was really due to the yarn tension, or some other factor, especially since we just changed some of our parts. So we re-tried the print, manually controlling the tension. BUT IT STILL DIDN’T WORK.
Extrusion Multiplier = 0.2: Fail 3.
At this point, it seemed that the problem wasn’t due to the yarn tension, and there was some other problem with our embroidery machine. It could be because the new tubing was too short, our new needle was not sharp enough, or even because the newly assembled parts were a bit loose.
We opened up the main body to check, and sure enough, the Needle-Tubing Connector was not doing a good job of clamping the needle tightly. Screwing the screws in tighter didn’t seem to help, so we sent a copy of Needle-Tubing Connector Mk VII (first seen in [#26]) for printing while we went for lunch.
After lunch, we clamped our needle and tubing with the newly printed Needle-Tubing Connector. The needle was securely clamped this time!

Needle, sitting snuggly in the more secure Needle-Tubing Connector.
Extrusion Multiplier = 0.2, Attempt 2 (with new Needle-Tubing Connector)

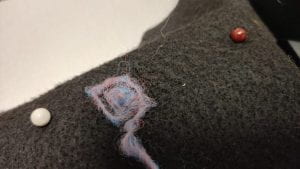
Extrusion Multiplier = 0.2: Fail 4. Note that the centre seems to be very bunched up.
We couldn’t really observe whether the tension was the main issue here because the yarn wasn’t felting consistently, so we moved on to other things…
Update On Preventing Needle Movement Before Print Start Using G-Code
In [#29] we solved the problem of the needle jabbing rapidly before the start of the print by removing 2 lines that appeared in the G-code:
G1 E-4.0000 F2400
G1 E4.0000 F720
When we presented on this yesterday, Mr Hanyang was baffled because he couldn’t understand where the two lines would come from. At the end of yesterday, we sent him an .fff file of our printer profile on Simplify3D so he could help to diagnose the problem. However, last night Mr Hanyang sent us an email to inform us that he could not replicate the issue. This made us very confused because the issue happens consistently for us, and we even showed him when he came to the lab yesterday.
Today we decided to try uploading the printer profile on the different computers in the M&T lab, and we found that using the computer outside the office eliminated the issue!! After some snooping around, we found that the version of Simplify3D on the computer outside the office (ver 4.1.2) was more updated the computers inside the office (ver 3.0.2 and ver 3.1.2). It seems that the updated version removed the lines of G-code which caused the problem of rapid jabbing. It turns out we don’t have to use our Python code to remove the 2 lines after all!
Back to Problem 3: Find a more ideal setting for yarn feeding
Since Extrusion Multiplier = 0.2 was obviously a flop (and because we wanted to move on), we decided to try varying the Extrusion Multiplier value within the range of 0.1 and 0.2.
Extrusion Multiplier = 0.15
We tested this by printing Mickey mouse again! This time, the G-code only coded for one layer of print (1mm height) instead of the entire Mickey mouse (3mm height). But the first time we tried to print with this setting, the previously printed square got in the way 🙁 The printer tried its best to print over the square, but it distorted the Mickey mouse shape.
(insert timelapse of Mickey printing over the square)
Extrusion Multiplier = 0.15, Fail 1.
We tested the print again with the same settings, and the print only went well on one side. Perhaps an issue with the base plate calibration? It’s completely possible that we accidentally shifted the plate while replacing the felt or styrofoam base…
(insert timelapse of Mickey)
Extrusion Multiplier = 0.15, Fail 2.
We recalibrated (or attempted to) the base plate and tried again, but to no good effect. So we tried once again, this time recalibrating the plate while printing.
Failed print again 🙁 Thanks for the moral support Min Htoo’s penguin
When that also failed, we tried using a spool to recalibrate the base plate. The logic here was that if the spool rolls on the base, it means that the base is not level, because the spool doesn’t roll on a flat tabletop (which is most probably parallel to the ground).
Vanessa calibrating the base plate using one of our printed feeding spools.
Unfortunately, when we tested the Mickey mouse print again with this calibration, the print didn’t go very well either.
We changed so many things were changed today that we couldn’t immediately pinpoint the problem. We checked the Needle-Tubing Connector piece (with the needle and tubing attached), and we checked the motion of the tubing by manually moving the piston up and down. These didn’t seem to be the issue.
Vanessa then raised up a good point – the problem might be due to the tubing being too short (since we cut off the bent part earlier today, essentially shortening the tubing). Claudia felt that the problem might be due to the yarn feeder. Since the yarn feeder would take some time to re-print, we tried to rectify this problem by creating a base plate out of two styrofoam pieces stacked on top of each other and held in place with two rubber bands. This would raise up the base and indirectly “lengthen” the tubing.
At the same time, Claudia helped to modify the Fusion360 file of Yarn Feeder Mk XII (last seen in [#29]) to remove the nozzle-like protrusion at the bottom, and sent it for printing.
Yarn Feeder Mk XIV.
Extrusion Multiplier = 0.15, Attempt 2 (with higher base)
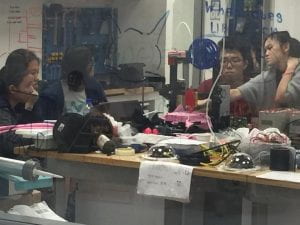
This attempt started off badly – the yarn wasn’t felting in properly despite having good tension. Tony even noticed us looking dejected and sent us this photo:

Photo from Tony, captioned: “Why so sad???”
Dr Ho also came in to check on our progress, and he assured us that in the process of creating we will face many ups and downs. With this encouragement, we decided to be patient and let the print proceed further. In an ideal world, our patience would pay off; in our un-ideal world, it didn’t 😞 The print ended, but Mickey mouse looked half filled, and you could clearly see the parts where the needle poked into the felt but didn’t catch the yarn.

A sad looking Mickey mouse print.
Another thing we learnt from this print (and most of the previous prints, actually) was that the yarn tension was only an issue if the yarn was too tense – even with incredibly slack yarn (which happened with the Extrusion Multiplier = 0.15 when the yarn didn’t catch well), as long as the needle pierced through the yarn, it could felt pretty well. Issues only arose when the needle didn’t pierce through the yarn.
Guo Yao then gave us the idea of trying yesterday’s print again (the one with 3mm height), and manually stop the print after one layer. So we did! This print also started off quite badly, and the yarn wasn’t getting pierced by the needle. However, this print progressed much better, and by the next round the printer was right on track!
…or so we thought 😭 Although the first and second round turned out decently, it stopped felting properly in the inner rounds, and it wasn’t because of the tension (we turned off the yarn feeder motor because it was overheating, and instead returned to manual yarn tensioning).
(insert photo of not-so-good? Mickey print)
We decided to try again, with the newly-printed Yarn Feeder Mk XIV. The first outline printed out all right, the second was a lil’ worse off, but the third was pretty bad. We guessed that the reason might have to do with the calibration of the base that’s causing the print to be inconsistent; similar to one of our very first tries printing the square, where one side was poorly printed and one side was well printed, due to the slope of the base (Higher = Better).
(photo of last print)


