
When: 18 July 2019, 10am
Members present: Carissa, Claudia, Vanessa (all the best at your alumni sharing, Alexis!)
Despite yesterday’s setbacks, we’re up early, ready to tackle today’s challenges:
- Test the new base calibration to see if we can get a consistent print. (morning)
- Check if the tubing is really too short, i.e. test-print using one styrofoam base sheet instead of two. (morning)
- Tidy up the styrofoam base and the messy wiring. (afternoon)
- Manually shift the z-axis upward and print layer upon layer as a start to 3D printing. (evening)
- Try raising by 1mm, then 1.5mm, etc.
Here we go!
Problem 1 | Test the new base calibration to see if we can get a consistent print
Our first print of the day was another Mickey mouse! We had to do a bit more calibration, but overall it was a pretty smooth print. We managed to get a nicely printed Mickey mouse, except one line which didn’t print out for some reason.
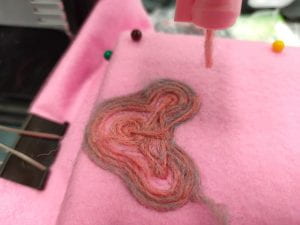
First print of the day, looking pretty good!
So far the base calibration seems to be working just fine! But we found another problem: the stepper motor that helps feed the yarn overheats after about 15 minutes of continuous printing, so we need to find a solution for that. Guo Yao suggested that we attach a heat sink to the stepper motor so it can dissipate heat more efficiently. However, Tony said that it must be a problem with our coding, since all the other stepper motors on our machine can run continuously without overheating for the entire print. Later on we’ll probably look through Marlin and the settings on Simplify3D to see if there’s any changes we can make to solve the problem. In the mean time, we’ll go back to manually controlling the tension.
Problem 2 | Check if the tubing is really too short
In order to work on the base plate, we need to check one crucial thing – is the tubing really too short? So, we removed one of the styrofoam base sheets and started another Mickey mouse test print.
When we were removing the felt cloth from the styrofoam base sheet, we turned it around and saw something funny – the felting process created hair-like strands on the other side of the cloth, and the failed Mickey mouse prints looked like balding Mickeys.
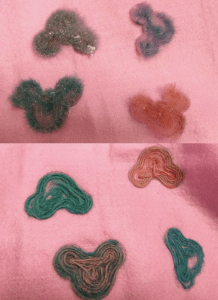
Top: 1 furry Mickey and 3 balding Mickeys. Bottom: 1 well-printed Mickey and 3 not-so-well-printed Mickeys.
We still had to re-calibrate the base because the two styrofoam pieces were held together by two rubber bands, which caused a bit of uneven elevation on the base. The print (which we ran for two layers straight, for a total of 1 h 15 min) went really well!! So evidently the problem wasn’t the length of the tubing – it was the calibration of the base all along!
2nd print of the day – took really long, but still looking good!
This print will go to Tony’s adorable daughter – Enxi!

We even hand felted Enxi’s name on it!
With that out of the way, we could finally 3D print a sturdier base to contain our styrofoam block!
Problem 3 | Tidy up the styrofoam base and messy wiring
To prevent our block from shifting around, we needed a base in Fusion360 that could securely hold the styrofoam block and could be easily clamped onto our printers base. We came up with a simple design:

Our simple base design, which looks a bit like a mini swimming pool.
We sent it for printing in the CR10, and we plan to collect it tomorrow – Simplify3D estimated that it would take 18 hours to print completely!
Problem 4 | Manually shift the z-axis upward and print layer upon layer as a start to 3D printing
This problem actually solved itself (amazingly)! When we load a print with more than one layer, the Z-axis motor of our 3D printer gets activated after each layer, lifting the sewing module slightly so that the new layer can print directly over the previous layer. We actually used this to print the two layers of Mickey mouse earlier today!
Printing other things!
Printing Letters
Since earlier on we hand felted Enxi’s name onto our printed Mickey mouse, we decided to try and see if our embroidery machine could print out letters. We started with the first letter of Enxi’s name, E.
The cornering didn’t turn out very well, and it’s probably because the turns are too sharp for the machine to handle. BUT besides that small issue, the print went smoothly, and the E is recognisable as an E! Guo Yao suggested that we could increase the rpm slightly of the jabbing stepper motor to improve the felting at sharp corners.
Printing of the letter E – you can see how the middle section of the E isn’t printed so well.
Taking Guo Yao’s suggestion, Vanessa modified the Arduino code for the jabbing stepper motor to increase its rpm slightly. For the next print, we used the higher rpm setting and also sliced all four letters of Enxi’s name! Because of the limitations of our embroidery machine, all the letters printed out like they were stuck together, and it wasn’t so recognisable as a name 🙁 But we can always do some post-processing to remove the threads that join the letters together.
Printing of Enxi, with the letters all joined together.
We decided to try printing Enxi’s name again, this time with larger letters. It was a rough start because we forgot to start the jabbing motor only after the homing process, but when we ran it a second time, the print went smoothly! There were a few gaps here and there, but we’re satisfied with the print quality.
Printing of Enxi again, this time slightly bigger than the previous print.
Printing an octopus (Ozone clone!)
Excited by this development, Claudia quickly designed an octopus for us to print out. If this print works, we’ll be one step closer to our initial goal when starting this project – printing a soft toy like Ozone! And it did work out (after a record print timing of 1 h 45 min)!! Even with all the sharp angles of each tentacle, our printer managed to pull through and felt the shape of the octopus really well. The feeding spool motor didn’t fare as well though, and we had to unplug it to prevent it from overheating.
Printing of Ozone clone! Watch to the end to see a brief comparison with the sliced file, as well as Vanessa doing some post-processing.
Also, because the sliced file had some portions which weren’t exactly concentric, our embroidery machine printed some weird-looking lines across Ozone clone’s tentacles 😅

The sliced file of Ozone clone, featuring many weird shapes in his head and a few tentacles with only one printed layer.
…And we’re done for today!! Although today we didn’t try printing any more than 2 layers, we definitely feel like there’s been some progress since yesterday! 🎉 And we’re looking forward to testing out more things tomorrow!
Here’s the plan for tomorrow:
- Tidy up embroidery base and messy wiring (something we’ve been putting off for a long time…)
- Start on video for submission
- Work on final presentation slides
- Find the root cause of the yarn feeding stepper motor overheating 🔥